Code-Free AI Automation: Build Your First Smart Routine in 2026 (Beginners Step-by-Step How-To)
Key Takeaways
- No-code AI automation empowers individuals to build smart routines without writing any code.
- It transforms tedious manual tasks into automated workflows, significantly boosting personal productivity.
- The system uses a visual, drag-and-drop interface with pre-built 'digital Lego blocks.'
- This approach replaces complex coding, APIs, and data structures with simple visual connections.
- The 'AI' aspect is embedded within these pre-built blocks, offering advanced capabilities like summarization.
I remember the moment this all clicked for me. It was a Tuesday afternoon. I was buried under a mountain of research survey responses—hundreds of them, all in different formats, all needing to be categorized, summarized, and entered into a project management tool. It was tedious, soul-crushing work that was eating into the time I needed for actual analysis. I thought, “There has to be a better way.” That evening, I stitched together my first rudimentary AI workflow using a no-code platform. It watched my email for new survey responses, used an AI model to understand and summarize the text, and then neatly created a task in my project board with all the relevant information. The next morning, I woke up to see the entire backlog cleared. It felt like magic. That’s the feeling I want to give you today.
Comprehensive Foundations & The “Why Now” of No-Code AI Automation
Before we start building, let’s take a moment to ground ourselves. It’s 2026, and the term ‘AI’ is everywhere, often wrapped in layers of hype and complexity. My goal in this first module is to strip all of that away and give you a rock-solid, foundational understanding. We’re going to answer the big questions: What is this stuff, really? And is no-code AI automation difficult to learn? (Spoiler: it’s not, and I’ll prove it to you.)
What is No-Code AI Automation? A Simple Analogy
Let’s forget the jargon for a second. Imagine you have a set of digital Lego blocks. Each block performs a specific task:
- One block can read your emails.
- Another block can understand the sentiment of a sentence (is it positive or negative?).
- Another can write a summary of a long piece of text.
- And another can post a message to a Slack channel or add a row to a Google Sheet.
Historically, to make these blocks work together, you needed to be a “Lego Master Builder”—a programmer who could write complex code (the “glue”) to connect them. You had to understand APIs, data structures, and programming languages. It was a powerful but exclusive club.
No-code AI automation changes the game entirely. It gives you a visual canvas and a set of pre-built connectors. Instead of writing code, you simply drag and drop these blocks and draw lines between them to tell them what to do and in what order. The “AI” part of this is the addition of incredibly powerful new blocks—the ones that can summarize text, analyze images, transcribe audio, or even generate creative ideas. You are no longer just connecting simple apps; you are orchestrating intelligent agents to perform complex, cognitive tasks for you. This is the heart of what we’re doing: building AI workflow automation using a visual, intuitive interface.
So, to answer the question directly: What is no-code AI automation? It is the practice of using visual, drag-and-drop platforms to connect different applications and AI models, creating automated sequences of tasks (or “smart routines”) that perform work without requiring you to write any programming code. You become the director of a digital assembly line, not the person manually welding the parts together.
Why This is the Most Important Skill for 2026
The rise of the “citizen developer” is not just a trend; it’s a fundamental shift in the workforce. A citizen developer is someone like you—a marketer, a project manager, a small business owner, a researcher—who can build business applications and automations for their own use, without formal training in software development. This is incredibly empowering.
In the past, if you had an idea to improve a process, you’d have to submit a request to an overloaded IT department and hope they could get to it in the next six months. By 2026, that model is obsolete. The tools for no-code AI automation are now so mature and accessible that you can have an idea in the morning and a working prototype by the afternoon. This ability to automate tasks without coding is becoming as essential as knowing how to use a spreadsheet. It allows you to:
- Eliminate Repetitive Work: Free yourself from the copy-paste drudgery that drains your energy and creativity.
- Amplify Your Impact: Automate the busywork so you can focus on the strategic, high-value parts of your job.
- Innovate Rapidly: Test new ideas and workflows instantly without needing a budget or a development team.
- Create Personal Leverage: Build systems that work for you 24/7, even when you’re sleeping.
This isn’t about replacing humans. It’s about augmenting them. It’s about giving you superpowers. The philosophy here is deeply aligned with the principles of the open web, championed by organizations like Mozilla, whose MDN Web Docs have long focused on making complex web technologies accessible to everyone. As they state, providing clear documentation and tools empowers people to build. We’re simply extending that philosophy from building websites to building intelligent systems. This is how beginners can use AI without coding—by leveraging platforms built on these principles of accessibility.
Prerequisites & Your Complete No-Code AI Automation Environment Setup
Alright, theory is great, but let’s get our hands dirty. In this module, we’ll set up your digital workshop. The good news? Unlike traditional programming, there are no complex compilers or command-line tools to install. Our “environment setup” is about creating accounts on the right platforms and organizing our thoughts. It’s a simple, five-step process that will take you less than 15 minutes.

Step 1: Choosing Your Core Automation Platform
This is the most important decision you’ll make. Your automation platform is your central workbench. For this beginner’s guide, we need a tool that is visual, has a generous free plan, and offers powerful, easy-to-use AI integrations. In 2026, the two dominant players for this are Make.com and Zapier.
- Zapier: Incredibly user-friendly, with a simple “trigger-action” model. It supports thousands of apps. It’s like the Apple of automation—sleek, simple, and just works.
- Make.com (formerly Integromat): Far more visual and flexible. It shows you the entire workflow as a connected diagram, which I find helps immensely in understanding the flow of data. It offers more advanced logic (like routers and error handlers) even on its free plan. It’s more like the Android of automation—powerful, customizable, and visually dynamic.
For this masterclass, we will use Make.com. Its visual interface is, in my opinion, superior for learning how data flows from one step to another, which is a critical concept for beginners to grasp. Its pricing model is also generally more generous with the number of “operations” you can perform on the free tier.
Action: Go to make.com and sign up for a free account. Use your Google account or email. No credit card is required. This will be our primary workbench.
Step 2: Securing Your AI “Brain” – An OpenAI Account
Our automation platform is the “body,” but we need an AI “brain” to do the intelligent work. While some platforms have built-in AI, using a dedicated AI provider gives you access to the most powerful models on the market. The industry standard for this is OpenAI, the creators of the GPT series of models.
Action: Go to platform.openai.com and create an account. When you sign up, you’ll typically receive some free credits, which are more than enough for our project and for extensive experimentation. Once you’ve created your account, navigate to the “API Keys” section in the left-hand menu. Create a new secret key and give it a name like “Make.com Key”. Copy this key immediately and save it somewhere safe, like a password manager. You will not be able to see it again. This key is like a password that allows Make.com to talk to your OpenAI account.
Step 3: Preparing Your “Input” and “Output” Apps
Every automation needs a starting point (an input) and an ending point (an output). For our first smart routine, we’ll build something practical and universally useful: an AI-powered system to analyze and categorize incoming feedback.
Here’s what we’ll need:
- Input App (Google Forms): A simple, free way to collect feedback.
- Output App (Google Sheets): A free, simple database to store our analyzed results.
- Notification App (Slack or Email): To let us know when the automation has done its job.
Action:
- Go to
forms.google.com. Create a new, blank form. Title it “Customer Feedback Form.” Add one question: a “Paragraph” type question, and label it “Please share your feedback, suggestions, or issues below.” - Go to
sheets.google.com. Create a new, blank spreadsheet. Name it “AI-Analyzed Feedback.” Create the following headers in the first row:Timestamp,Raw Feedback,Sentiment,Category,Summary,Action Item. - Ensure you are logged into the Gmail or Slack account you want to receive notifications from.
Step 4: The “CLI Verification” of the No-Code World: Connecting Your Accounts
In traditional coding, you might use a Command-Line Interface (CLI) to verify that a tool is installed correctly. In the world of no-code, our “verification” is connecting our apps and seeing a green checkmark. This is where we link our workbench (Make.com) to our tools (Google, OpenAI, Slack).
We will do this within the Make.com interface in Module 4, but it’s important to understand the concept now. You won’t be typing --version into a black terminal window. Instead, you’ll click “Add Connection,” log into your Google account, and grant Make.com permission to access your Forms and Sheets. This process, called OAuth, is a secure, standard way for apps to talk to each other without you ever sharing your password. The success of this connection is your verification. This is a core principle you’ll find in developer documentation everywhere, from Google’s own identity guides to the foundational web standards described on MDN—it’s all about secure, authenticated communication between services.
Core Implementation Architecture: Visualizing Your First Smart Routine
Before we jump into Make.com and start clicking, we need a blueprint. The biggest mistake beginners make is starting to build without a clear plan. In this module, I’ll teach you how to think like an automation architect. We’ll map out our workflow using a simple, visual card structure that you can sketch on a napkin.

The Trigger, Action, and Logic (TAL) Framework
Every automation, no matter how complex, is built from three fundamental component types. I call it the TAL framework: Trigger, Action, and Logic.
- Trigger: The “When this happens…” part. This is the event that kicks off your entire workflow. It’s always the first block in your chain. A trigger is passive; it just waits and listens.
- Action: The “Then do that…” part. This is a task your workflow performs. Actions are the workhorses of your automation—sending an email, creating a spreadsheet row, calling an AI model. You can chain many actions together.
- Logic: The “But only if…” or “Do this for each…” part. Logic components are the traffic cops of your workflow. They can route data down different paths, repeat actions for multiple items, or handle errors.
Visualizing Our Feedback Analyzer with a Card Grid
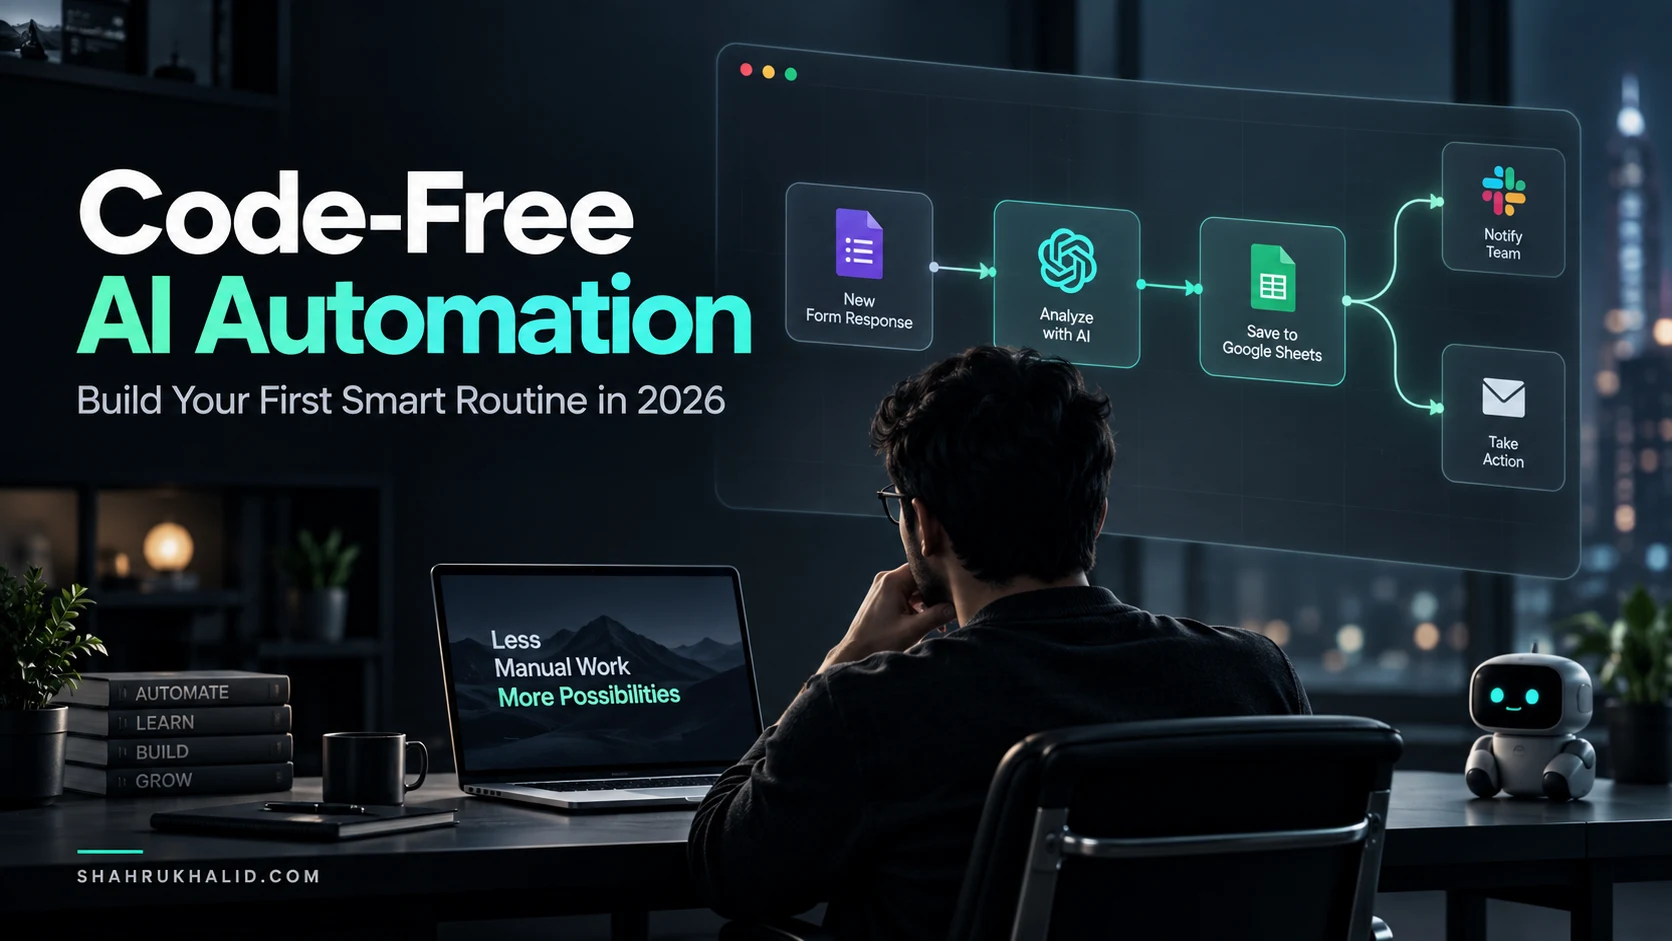
Let’s apply the TAL framework to the smart routine we’re about to build. Imagine we have a set of index cards on a table. Here’s how we’d lay them out:
Smart Routine Blueprint: AI Feedback Analyzer
Type: App Trigger
App: Google Forms
Event: “Watch for New Responses”
Description: This routine starts the moment someone clicks “Submit” on our feedback form.
Type: AI Action
App: OpenAI (GPT-4o)
Event: “Create a Chat Completion”
Description: Take the raw feedback text from Card 1 and send it to the AI with a specific set of instructions (a “prompt”).
Type: App Action
App: Google Sheets
Event: “Add a Row”
Description: Take the original feedback from Card 1 AND the structured AI analysis from Card 2 and write it all into a new row in our spreadsheet.
Type: Flow Control
App: Built-in Router
Event: “Check Sentiment”
Description: Create two paths. Path A: If the sentiment from Card 2 is “Negative.” Path B: For all other sentiments.
Type: Notification Action
App: Slack
Event: “Create a Message”
Description: If the feedback is negative, immediately send a high-priority alert to the #support-urgent channel with the feedback summary.
This visual map is everything. Before you build, you should always be able to sketch this out. It clarifies your thinking and turns a vague idea (“I want to automate feedback”) into a concrete, step-by-step plan. This structured thinking is the essence of what it means to be a citizen developer AI expert. You’re not just connecting apps; you’re designing intelligent systems. This is the pedagogical clarity we strive for at shahrukhalid.com—making complex architectures feel intuitive and manageable.
Hands-on Practical Implementation: Building Your First Smart Routine Step-by-Step
This is the moment we’ve been building towards. We have our plan, we have our accounts, and now we’re going to bring our smart routine to life. I want you to follow along with me, click by click. Don’t just read—do. Open Make.com in another tab and let’s build this together. This is your step by step no-code AI automation tutorial.
Step 1: Creating Your New Scenario in Make.com
Log into your Make.com account. You’ll see a dashboard. In the top right corner, click the big purple button that says “+ Create a new scenario.”
You are now looking at the scenario editor—a blank white canvas. In the center is a large purple circle with a plus sign. This is where our journey begins. This is where we will define our trigger.
Step 2: Configuring the Trigger (Google Forms)
- Click the central purple circle. A massive list of applications will appear. In the search box, type “Google Forms” and click on its icon.
- A list of possible triggers and actions will appear. We want the one that starts the workflow. Select “Watch Responses.”
- A configuration box will pop up. The first thing it needs is a connection. Click the “Add” button next to the “Connection” field. A new window will open, asking you to sign in with your Google account (the one you used to create the form). Sign in and grant Make.com the requested permissions. This is the “OAuth” process we discussed. It’s secure and standard.
- Once connected, you’ll be back in the configuration box. Now, select your “Customer Feedback Form” from the “Form” dropdown menu.
- Click “OK.” Your trigger is now set up. It’s a green module on your canvas, ready to listen for new submissions.
Verification: To ensure this works, let’s get some sample data. Right-click the Google Forms module and choose “Run this module only.” Now, go to your Google Form and submit a test response (e.g., “The new dashboard is a bit confusing, but I love the color scheme.”). Go back to Make.com. You should see a small “1” in a bubble appear above the module, indicating it successfully received the data. Click the bubble to inspect the data—you’ll see the exact feedback you just submitted. Success!
Step 3: Adding the AI Brain (OpenAI)
Now for the magic. We need to add our second block—the AI action.
- Hover over the right side of the Google Forms module until a small plus sign appears. Click it to add the next module.
- Search for “OpenAI” and click its icon.
- From the list of actions, select “Create a Completion.” (Note: In some versions, this may be called “Create a Chat Completion.” They are very similar.)
- Just like with Google, you’ll need to add a connection. Click “Add” next to the “Connection” field. This time, it will ask for an “API Key.” This is the key you copied from the OpenAI platform in Module 2. Paste it here and save.
- Now we configure the AI’s task. This is the most critical part: the prompt.
- Method: Select “Create a Chat Completion”.
- Model: Choose the latest and most capable model available, likely
gpt-4o. It’s fast, cheap, and multimodal. - Messages: This is where we instruct the AI. Click “Add item” to create a message.
- Set the Role to
User. - In the Message Content box, we will write our instructions and map the data from our form. This is the core of our “prompt engineering.” Type the following text exactly, and when I say
[Map the feedback text here], you will click on the field and select the data from the Google Forms module (it will look something like1. What is your feedback...).
- Set the Role to
The Prompt (Copy this into the Message Content box):
Feedback: "[Map the feedback text here]"
Based on the feedback, perform the following tasks:
- <strong>Sentiment Analysis:</strong> Determine if the sentiment is "Positive", "Negative", or "Neutral".
- <strong>Categorization:</strong> Categorize the feedback into one of the following: "Bug Report", "Feature Request", "User Interface/Experience", "Pricing/Billing", or "General Praise".
- <strong>Summarization:</strong> Provide a concise, one-sentence summary of the core issue or praise.
- <strong>Action Item:</strong> Suggest a concrete, single next action for a team member to take. For example, "Log a ticket for the UI team" or "Share praise with the marketing team."
Output your analysis ONLY in a valid JSON format, like this example:
{
"sentiment": "Negative",
"category": "User Interface/Experience",
"summary": "The user finds the new dashboard layout confusing.",
"action_item": "Create a task for the UX team to review the dashboard navigation."
}
Why JSON? Because asking the AI to return a structured format like JSON (JavaScript Object Notation) makes it incredibly easy for the next steps in our automation to use the data. We’re not just getting a block of text back; we’re getting neatly labeled fields. This is a pro-tip for reliable AI workflow automation. The structure of this prompt is inspired by the clear, task-oriented examples you’ll find in Google’s AI documentation at ai.google.dev, where they emphasize providing clear instructions and examples to the model.
Click “OK.” Your AI module is now connected.
Step 4: Parsing the AI’s Response
The AI will give us a text string that looks like JSON. We need to convert that text into actual data fields that Make.com can use. This is a common step.
- Add another module after the OpenAI module.
- Search for and select the built-in “JSON” module.
- Choose the action “Parse JSON.”
- In the configuration, it will ask for a “JSON string.” Map the output from the OpenAI module here. It will be under
Choices[] -> Message -> Content. - Click “OK.” This module will now take the AI’s text response and turn it into usable data tokens:
sentiment,category,summary, andaction_item.
Step 5: Populating the Google Sheet
Now we record our results.
- Add another module after the JSON module. Search for “Google Sheets” and select the action “Add a Row.”
- Connect to your Google account if you haven’t already.
- Select your “AI-Analyzed Feedback” spreadsheet and the correct sheet.
- You will now see fields corresponding to the column headers you created:
Timestamp,Raw Feedback, etc. This is where we map all our data!- Timestamp: Map the
Timestampfrom the original Google Forms trigger. - Raw Feedback: Map the feedback text from the Google Forms trigger.
- Sentiment: Map the
sentimentfield from the “Parse JSON” module. - Category: Map the
categoryfield from the “Parse JSON” module. - Summary: Map the
summaryfield from the “Parse JSON” module. - Action Item: Map the
action_itemfield from the “Parse JSON” module.
- Timestamp: Map the
- Click “OK.”
Step 6: Adding Logic and Notifications (The Router)
Let’s add the final piece: an urgent notification for negative feedback.
- Right-click on the connection between the “Parse JSON” and “Google Sheets” modules and select “Add a router.” A router will appear, splitting the path in two. The Google Sheets module will now be on one
Frequently Asked Questions